
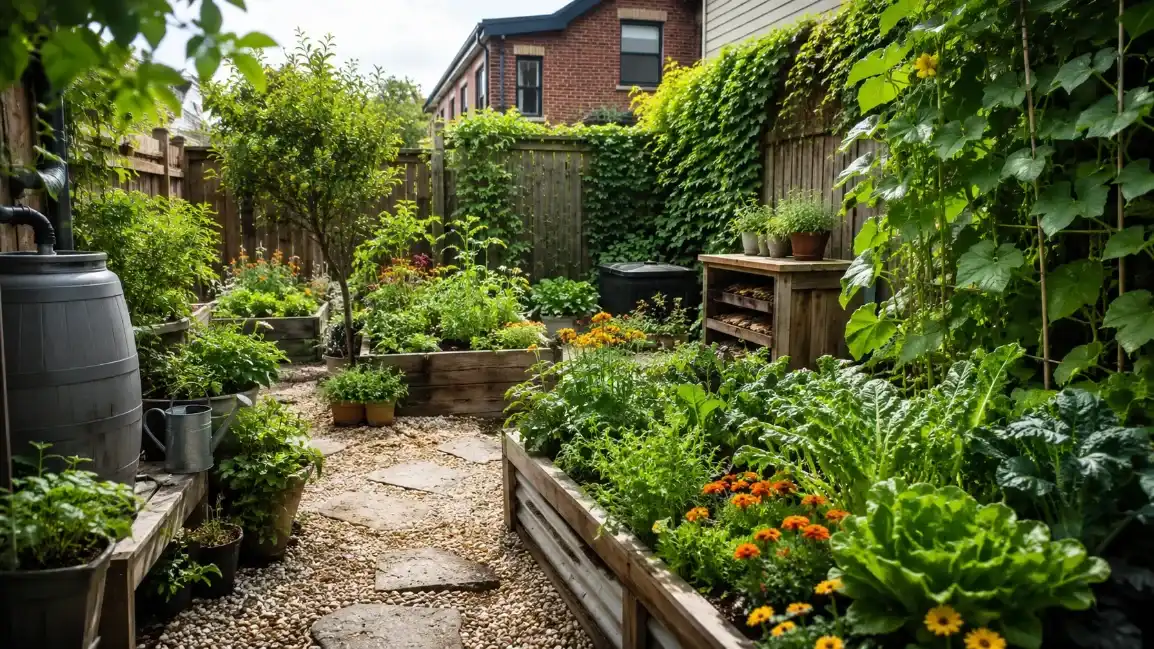
Permaculture for Small Spaces: Self-Sufficient Garden Layouts
Permaculture for small spaces makes it possible to grow meaningful amounts of food in a backyard, courtyard, rooftop, balcony or compact urban garden. You do not need acres of land to create a productive and partially self-sufficient garden. What matters most is how efficiently you use sunlight, soil, water, vertical space and plant relationships.
A well-designed small permaculture garden can produce vegetables, herbs, berries, edible flowers, compost materials and even small fruit trees within a limited footprint. The goal is not to fill every available space with plants. The goal is to create a system in which each element performs several functions.
In this guide, you will learn how to design self-sufficient garden layouts for 100, 250 and 500 square feet, organize permaculture zones, build no-dig beds, select productive plant guilds, harvest rainwater and estimate how much food a small garden can realistically produce.
Table of Contents
Permaculture design principle: In a small garden, the goal is not to fit more plants randomly. The goal is to make every element perform more than one function.
Can a Small Garden Be Self-Sufficient?
A small garden can provide a meaningful percentage of a household’s fresh vegetables and herbs, but complete food self-sufficiency is difficult in a very limited area. Staple crops such as wheat, corn, dry beans, potatoes and oil-producing plants require considerably more land than salad greens, herbs and high-value vegetables.
For most households, a realistic goal is partial self-sufficiency. A carefully planned small garden may supply most seasonal herbs and salad crops, along with a useful amount of tomatoes, beans, cucumbers, berries and leafy vegetables.
| Garden Size | Realistic Use | Potential Production |
|---|---|---|
| 100 sq ft | Herbs, salads and vertical crops | Fresh produce for 1 person |
| 250 sq ft | Mixed vegetables, herbs and berries | Regular seasonal produce for 1–2 people |
| 500 sq ft | Intensive vegetables, berries and compact fruit | A significant portion of produce for 2 people |
| 1,000 sq ft | Vegetables, storage crops and small fruit trees | Substantial seasonal produce for a small household |
Actual yields depend on climate, sunlight, soil quality, crop selection, succession planting and the gardener’s experience. Small gardens perform best when they prioritize crops that are expensive to buy, highly productive and frequently used.
1. Zone Planning: Analyzing Your Microspace
Permaculture zones organize a space according to how often you use each element. On a large farm, zones may extend from the house to wild woodland. In a small garden, the same concept still applies, but the distances are compressed. A few meters can make the difference between a system you use daily and one you neglect.
Understanding Zones 0 to 2 in a Small Garden
For small-space self-sufficiency, focus mainly on Zone 0, Zone 1, and Zone 2.
Zone 0: The Home and Daily Interface
Zone 0 is your house, apartment, kitchen, storage area, balcony door, or back entrance. This is where the garden connects to your daily life.
Use Zone 0 for:
- Seed starting trays near a bright window
- A kitchen herb shelf or microgreens tray
- Fermentation jars, drying herbs, and seed storage
- Compost collection bucket
- Rainwater observation and greywater access
- Food preservation station
Practical idea: place a 5–10 liter compost caddy in the kitchen and empty it into a worm bin or outdoor compost every 2–3 days. This prevents smells and keeps nutrient cycling effortless.
Zone 1: The High-Use Growing Area
Zone 1 should be the most accessible and intensively managed part of the garden. It belongs as close as possible to your kitchen door, balcony access, or main pathway.
Plant Zone 1 with crops you harvest often:
- Lettuce
- Arugula
- Spinach
- Parsley
- Chives
- Basil
- Cilantro
- Cherry tomatoes
- Strawberries
- Radishes
- Culinary herbs
- Salad onions
A good rule: if you harvest it more than twice per week, place it in Zone 1.
For a small garden, Zone 1 may be:
- One raised bed near the door
- A vertical herb wall
- A balcony container system
- A keyhole bed
- A kitchen garden strip along a path
Zone 2: The Semi-Regular Production Area
Zone 2 contains crops and systems that need attention weekly rather than daily.
Use Zone 2 for:
- Dwarf fruit trees
- Berry bushes
- Potatoes in grow bags
- Garlic and onions
- Perennial vegetables
- Compost bins
- Worm farms
- Pollinator strips
- Small greenhouse or cold frame
- Rain barrel overflow beds
Zone 2 should still be easy to reach, but it does not need to sit directly outside the kitchen.
Tracking Sun Patterns in a Limited Space
Small gardens are strongly affected by fences, walls, nearby buildings, trees, sheds, and neighboring houses. Before building beds, track sunlight for at least one full day. Ideally, observe your space during spring, summer, and autumn because sun angles change.
Use this simple method:
- Draw a rough map of your space.
- Mark sunny and shaded areas at 8 a.m., 11 a.m., 2 p.m., and 5 p.m.
- Repeat on a clear day.
- Label each area by daily sun exposure.
Use these categories:
| Sun Exposure | Hours of Direct Sun | Best Use |
|---|---|---|
| Full sun | 6–8+ hours | Tomatoes, peppers, squash, beans, cucumbers, fruiting crops |
| Partial sun | 4–6 hours | Leafy greens, herbs, peas, root crops |
| Partial shade | 2–4 hours | Mint, parsley, sorrel, lettuce, spinach, currants |
| Deep shade | Less than 2 hours | Compost, mushroom logs, water storage, tool storage |
For high-yield vegetables, reserve your best sun for fruiting crops. Tomatoes, peppers, eggplants, melons, cucumbers, and squash need the strongest light. Leafy greens can handle more shade, especially in hot summers.
Reading Wind Direction
Wind dries soil, damages tender leaves, stresses climbing plants, and reduces pollinator activity. In small spaces, wind often funnels between buildings or along fences.
To identify wind patterns:
- Hang strips of fabric or ribbon in several places.
- Watch where leaves dry fastest after watering.
- Notice where seedlings bend or break.
- Track cold wind corridors in early spring.
Use wind-sensitive crops such as tomatoes, peppers, and young beans in protected positions. Use tough, aromatic, or woody plants as living wind buffers:
- Rosemary
- Lavender
- Sage
- Currants
- Dwarf elderberry
- Jerusalem artichoke in containers
- Espalier fruit trees
- Tall perennial flowers
Even a 60–90 cm high living edge can reduce wind stress for low crops.
Observing Water Flow
Water is one of the most important design elements in permaculture. In small gardens, water either runs off hard surfaces or pools in compacted areas. Both problems can become assets.
After heavy rain, observe:
- Where water enters the space
- Where it collects
- Where soil stays dry
- Where roof runoff lands
- Where paths become muddy
- Where containers dry too quickly
Use wet spots for thirsty plants:
- Mint in containers
- Watercress in controlled systems
- Rhubarb
- Currants
- Celery
- Willow structures
- Comfrey
Use dry edges for Mediterranean herbs:
- Thyme
- Rosemary
- Sage
- Oregano
- Lavender
- Hyssop
Pro tip: Never place a raised bed where water naturally drains away fastest unless you are prepared to irrigate it frequently. Put water-hungry annual vegetables where water is naturally available.
Designing Pathways Without Wasting Space
A small garden loses productivity when pathways are too wide, too random, or poorly placed. The best path system gives easy access without sacrificing growing area.
Recommended measurements:
| Garden Element | Practical Width |
| Main path for wheelbarrow access | 60–75 cm |
| Secondary path for foot access | 35–45 cm |
| Raised bed reachable from both sides | 90–120 cm |
| Bed against a wall or fence | 45–60 cm |
| Keyhole access path | 35–45 cm |
| Container gap for maintenance | 30–40 cm |
For maximum production, avoid beds wider than 120 cm if accessible from both sides. If a bed is against a wall, keep it under 60 cm so you can reach the back without stepping on the soil.
Smart small-space pathway designs include:
- Keyhole beds: A circular or U-shaped bed with one small access path into the center.
- Edge paths: A narrow path along one side with growing space on the other.
- Stepping stones: Useful where you only need occasional access.
- Mulched paths: Wood chips or straw reduce mud and slowly feed soil life.
- Vertical path edges: Trellises along paths turn circulation space into growing space.
Pathways should never be dead space. Line them with herbs, strawberries, edible flowers, or climbing supports.
2. Building the Foundation: No-Till Beds and Soil Health
A self-sufficient garden begins below the surface. Soil is not just a medium that holds roots. It is a living ecosystem of fungi, bacteria, worms, insects, minerals, organic matter, air, and water. When soil biology is healthy, plants become stronger, nutrient cycling improves, water retention increases, and pest pressure often drops.
The No-Till Philosophy
No-till, also called no-dig gardening, means building fertility from the top down instead of repeatedly turning the soil. In nature, forests and meadows do not get dug every spring. Leaves fall, roots die back, fungi spread, worms move organic matter downward, and soil structure improves layer by layer.
Digging and tilling can cause several problems:
- Breaks fungal networks
- Exposes soil organisms to sunlight and drying
- Brings dormant weed seeds to the surface
- Destroys soil aggregates
- Increases erosion
- Reduces water-holding capacity
- Disrupts earthworm channels
- Speeds up organic matter loss
In a small garden, soil disturbance is especially damaging because there is less total growing area. Every bed must stay productive. No-till gardening helps compact spaces build fertility year after year rather than starting from zero each season.
Permaculture design principle: Feed the soil, and the soil feeds the plants. Feed only the plant, and the system stays dependent on you.
Step-by-Step Sheet Mulching
Sheet mulching, often called lasagna gardening, is one of the easiest ways to create a no-till bed over lawn, weeds, compacted soil, or poor urban ground. It smothers unwanted vegetation while building a biologically active planting layer.
Materials You Need
For a 1 m x 2 m bed, prepare:
- Plain brown cardboard with tape removed
- 80–120 liters finished compost
- 40–80 liters aged manure or worm castings if available
- 1–2 buckets kitchen scraps or green plant material
- 1–2 bags autumn leaves, straw, or shredded prunings
- Wood chips for paths
- Watering can or hose
- Optional: rock dust, leaf mold, biochar, mycorrhizal inoculant
Avoid glossy cardboard, colored inks, synthetic carpet, treated wood chips, diseased plant material, and persistent perennial weed roots.
Layer 1: Mow or Cut Existing Vegetation
Cut grass and weeds as low as possible. Leave the cut material in place. This becomes the first green nitrogen-rich layer.
Do not remove the roots unless you are dealing with aggressive invasive plants such as bindweed, couch grass, or Japanese knotweed. For ordinary lawn and annual weeds, smothering is enough.
Layer 2: Add Compostable Scraps
Add a thin layer of green organic matter:
- Vegetable scraps
- Coffee grounds
- Fresh grass clippings
- Young weeds without seed heads
- Comfrey leaves
- Nettles before flowering
Keep this layer thin, around 2–5 cm. Thick wet layers can become anaerobic and smelly.
Layer 3: Cardboard Weed Barrier
Lay cardboard over the entire bed area with overlaps of at least 15–20 cm. Water the cardboard thoroughly until soft. This blocks light and suppresses weeds while worms gradually break it down.
Cut holes only where you want to plant large transplants immediately. For direct seeding, add enough compost on top to create a seed-friendly layer.
Layer 4: Compost and Soil Layer
Add 10–15 cm of mature compost on top of the cardboard. For hungry annual vegetables, 15–20 cm is better in the first year.
Use this layer for planting:
- Lettuce
- Kale
- Chard
- Bush beans
- Herbs
- Tomatoes as transplants
- Peppers as transplants
- Cucumbers as transplants
For carrots and parsnips, wait until the bed has settled and the cardboard has softened. Root crops prefer a deeper, looser profile.
Layer 5: Carbon Mulch
Add 3–7 cm of mulch around plants:
- Straw
- Shredded leaves
- Fine wood chips
- Grass clippings mixed with leaves
- Chopped garden prunings
- Partially decomposed leaf mold
Keep mulch 3–5 cm away from seedling stems to prevent rot.
Layer 6: Water Deeply
Water each layer as you build. The final bed should feel moist like a wrung-out sponge. Dry sheet mulch breaks down slowly and can repel water.
Layer 7: Plant Strategically
If building in spring, plant transplants immediately. If building in autumn, sow cover crops or let the bed settle over winter.
Good first-year crops for sheet-mulched beds:
- Tomatoes
- Zucchini
- Kale
- Chard
- Lettuce
- Beans
- Basil
- Calendula
- Nasturtium
- Potatoes under mulch
Maintaining No-Till Beds
A no-till bed improves when it is continually covered. Bare soil is a sign that biology is losing food, moisture, and protection.
Small-space maintenance routine:
- Add 2–3 cm compost each spring.
- Keep mulch 3–7 cm deep around established plants.
- Chop old plant stems at soil level instead of pulling roots.
- Leave healthy roots to decompose underground.
- Use cover crops in gaps longer than 6 weeks.
- Add worm castings around heavy feeders.
- Avoid stepping inside beds.
- Use a broadfork only if soil is severely compacted, and do not turn the soil.
Mycorrhizal Fungi and Small-Space Yield
Mycorrhizal fungi form relationships with plant roots. They extend the effective root zone, help plants access phosphorus and micronutrients, improve soil structure, and support communication between plants.
To support mycorrhizal fungi:
- Avoid synthetic phosphorus-heavy fertilizers.
- Reduce digging.
- Keep living roots in the soil as long as possible.
- Grow diverse plant families.
- Add compost, leaf mold, and woody mulch.
- Include perennials.
- Avoid leaving soil bare.
- Use local organic matter.
Plants that commonly benefit from mycorrhizal relationships include tomatoes, peppers, onions, leeks, fruit trees, berry bushes, beans, peas, herbs, and many perennials. Brassicas such as cabbage, broccoli, kale, and radish generally do not form strong mycorrhizal associations, so mix them with other plant families in the rotation.
Local Organic Matter: The Small Garden Fertility Engine
A small permaculture garden should not depend entirely on imported bags of compost. Use local organic matter to create fertility.
Reliable sources include:
- Autumn leaves
- Grass clippings from unsprayed lawns
- Coffee grounds
- Vegetable scraps
- Wood chips from untreated branches
- Spent potting soil
- Herb prunings
- Seaweed where legally and safely collected
- Animal bedding from herbivores
- Comfrey leaves
- Nettles
- Worm castings
For small spaces, comfrey is especially useful. Plant one or two sterile comfrey plants in Zone 2, then cut leaves 3–5 times per season as mulch around tomatoes, fruit bushes, squash, and compost piles.
3. Vertical Gardening and Living Layers
In a small-space permaculture garden, the most underused area is usually the vertical plane. Fences, walls, balcony railings, pergolas, trellises, arches, and shed sides can become productive growing surfaces. When you grow upward, you can often double or triple the effective growing area without expanding the footprint.
How Vertical Design Increases Yield
Vertical gardening helps you:
- Increase growing area
- Improve airflow around plants
- Reduce fungal disease
- Make harvesting easier
- Use sunlight more efficiently
- Create shade for heat-sensitive crops
- Add habitat for insects
- Separate crops in dense beds
- Turn paths into productive edges
For example, a 1 m x 2 m bed has 2 square meters of ground area. Add a 2 m high trellis along one side, and you create up to 4 additional square meters of growing surface for beans, cucumbers, peas, grapes, or climbing squash.
Trellises for Small Gardens
Different crops need different structures.
| Structure | Best Crops | Practical Height |
| A-frame trellis | Cucumbers, peas, small melons, beans | 120–180 cm |
| Cattle panel arch | Pole beans, cucumbers, squash, grapes | 180–220 cm |
| String trellis | Tomatoes, cucumbers, peas | 150–220 cm |
| Wall trellis | Grapes, espalier fruit, beans | 150–250 cm |
| Obelisk | Runner beans, sweet peas, small cucumbers | 120–180 cm |
| Balcony railing net | Peas, beans, nasturtium | 90–150 cm |
| Hanging baskets | Strawberries, herbs, trailing tomatoes | 30–60 cm drop |
Avoid weak decorative trellises for heavy crops. Mature cucumber vines, squash vines, and melons become surprisingly heavy after rain.
Productive Vertical Crop Choices
Best vertical crops for small spaces:
- Pole beans
- Runner beans
- Cucumbers
- Peas
- Indeterminate tomatoes
- Grapes
- Hardy kiwi in larger spaces
- Passionflower in mild climates
- Malabar spinach
- Climbing nasturtium
- Tromboncino squash
- Small melons in slings
- Hops where appropriate
- Espalier apples or pears
Spacing examples:
| Crop | Vertical Spacing |
| Pole beans | 15–20 cm apart |
| Peas | 5–8 cm apart |
| Cucumbers | 30–45 cm apart |
| Indeterminate tomatoes | 45–60 cm apart |
| Runner beans | 20–25 cm apart |
| Malabar spinach | 25–30 cm apart |
| Grapevine | 120–180 cm apart |
| Espalier apple | 180–250 cm apart |
Arches: Turning Pathways Into Food Tunnels
Arches are one of the best solutions for limited spaces because they use the air above pathways. Instead of choosing between a path and a bed, you can have both.
Use arches for:
- Pole beans over a narrow path
- Cucumbers over a kitchen garden walkway
- Grapes along a sunny side yard
- Small squash with fruit supported in slings
- Climbing flowers for pollinators
Practical dimensions:
- Minimum path width under arch: 60 cm
- Comfortable arch height: 190–220 cm
- Bed width at each base: 30–45 cm
- Best orientation: north-south where possible to distribute light evenly
Wall Planters and Pocket Systems
Wall planters are useful for herbs and shallow-rooted crops. They are not ideal for thirsty large vegetables unless irrigation is reliable.
Good wall-planter crops:
- Thyme
- Oregano
- Chives
- Parsley
- Lettuce
- Strawberries
- Nasturtium
- Alpine strawberries
- Mint in isolated pockets
- Small Asian greens
Use a moisture-retentive but well-draining mix:
- 40% compost
- 30% coconut coir or leaf mold
- 20% fine bark or composted wood fiber
- 10% perlite, pumice, or coarse sand
Wall planters dry out quickly. In summer, check moisture daily.
The 7 Layers of a Small Perma-Garden
Traditional food forests use layers that mimic natural woodland. In small spaces, the same idea can be adapted with dwarf plants, containers, espalier systems, and vertical supports.
Layer 1: Mini Canopy
In a small garden, the canopy is not a full-sized tree. It is a carefully chosen dwarf or trained fruit tree.
Options:
- Dwarf apple
- Dwarf pear
- Fig in container
- Mulberry in large container
- Patio peach
- Columnar apple
- Espalier fruit tree
- Citrus in frost-free climates or containers
Spacing:
- Dwarf fruit tree in ground: 180–300 cm apart
- Columnar fruit tree: 60–100 cm apart
- Espalier tree against wall: 180–250 cm apart
- Large container tree: minimum 40–60 liter container
Layer 2: Shrub Layer
Shrubs produce fruit, habitat, flowers, and wind buffering.
Good small-space shrubs:
- Currants
- Gooseberries
- Blueberries in acidic soil or containers
- Dwarf elderberry
- Raspberries with root control
- Rosemary in mild climates
- Lavender
- Aronia
- Honeyberry in cool climates
Spacing:
- Currants: 90–120 cm apart
- Gooseberries: 90–120 cm apart
- Blueberries: 75–120 cm apart
- Raspberries: 40–60 cm apart in rows
- Lavender: 40–60 cm apart
Layer 3: Herbaceous Layer
This is the main vegetable, herb, and flower layer.
Examples:
- Kale
- Chard
- Lettuce
- Basil
- Parsley
- Dill
- Fennel leaf types
- Calendula
- Borage
- Yarrow
- Echinacea
- Peppers
- Eggplants
Spacing:
- Lettuce: 20–30 cm
- Kale: 45–60 cm
- Chard: 30–45 cm
- Basil: 25–30 cm
- Parsley: 20–25 cm
- Peppers: 40–50 cm
- Eggplants: 45–60 cm
Layer 4: Ground Cover Layer
Ground covers protect soil, reduce evaporation, suppress weeds, and provide edible yields.
Good options:
- Strawberries
- Creeping thyme
- Nasturtium
- Clover paths
- Oregano
- Miner’s lettuce
- Sweet woodruff in shade
- Chamomile
- Purslane in warm climates
Spacing:
- Strawberries: 25–35 cm apart
- Creeping thyme: 20–30 cm apart
- Nasturtium: 30–45 cm apart
- Oregano: 25–35 cm apart
Layer 5: Rhizosphere
The rhizosphere includes root crops and underground yields.
Options:
- Garlic
- Onions
- Carrots
- Beets
- Radishes
- Potatoes in bags
- Jerusalem artichoke in containers
- Turmeric in warm climates or pots
- Ginger in containers
- Spring onions
Spacing:
- Garlic: 10–15 cm apart
- Onions: 10–15 cm apart
- Carrots: 5–8 cm apart
- Beets: 8–12 cm apart
- Radishes: 3–5 cm apart
- Potatoes in grow bags: 2–3 seed potatoes per 40 liter bag
Layer 6: Vertical Layer
This includes climbing plants and trained crops.
Options:
- Pole beans
- Peas
- Cucumbers
- Grapes
- Climbing nasturtium
- Indeterminate tomatoes
- Malabar spinach
- Small squash
- Espalier fruit
Layer 7: Fungal and Decomposition Layer
Small gardens often ignore fungi, but they are essential for nutrient cycling.
Use shaded corners for:
- Leaf mold piles
- Mushroom logs
- Wood chip paths
- Worm bins
- Compost bays
- Fungal-rich mulch
- Decomposing branches
This layer turns waste into fertility and supports the entire garden.
Pro tip: In small spaces, one plant can occupy several layers. A grapevine uses the vertical layer, shades a seating area, feeds pollinators, produces fruit, and drops leaves that become mulch.
4. Companion Planting & Guilds: The Ultimate Synergy
Companion planting is not magic. It is practical ecological design. Plants can support each other by attracting beneficial insects, confusing pests, fixing nitrogen, mining minerals, shading soil, acting as living mulch, or providing structural support.
A plant guild is a group of species arranged around a central crop, usually a fruit tree, shrub, or main vegetable. The goal is to reduce inputs while increasing resilience.
How Plants Support Each Other
Plants can provide several functions:
- Pest confusion: Strong scents make it harder for pests to locate crops.
- Beneficial insect attraction: Flowers feed hoverflies, lacewings, bees, and parasitic wasps.
- Nutrient support: Legumes fix nitrogen; deep-rooted plants bring minerals upward.
- Structural support: Corn, sunflowers, or trellises support climbing beans.
- Ground protection: Low plants shade soil and reduce evaporation.
- Trap cropping: Some plants attract pests away from main crops.
- Disease reduction: Better spacing and diversity reduce disease spread.
Companion Planting Matrix
| Main Crop or Guild | Companion Plants | Synergistic Benefits | What to Avoid |
| Tomato-Basil-Marigold | Basil, French marigold, calendula, parsley, chives | Basil uses lower space and may help confuse pests; marigolds support beneficial insects; calendula attracts pollinators | Avoid planting tomatoes too close to potatoes because both share blight risk |
| Three Sisters | Corn, pole beans, squash | Corn provides support; beans fix nitrogen; squash shades soil and suppresses weeds | Avoid weak corn varieties that cannot hold bean weight |
| Apple Tree Guild | Chives, comfrey, daffodil, yarrow, clover, strawberries | Chives may deter pests; comfrey provides mulch; daffodils can discourage digging animals; clover covers soil | Avoid grass competition around young trees |
| Cucumber-Dill-Nasturtium | Dill, nasturtium, radish, calendula | Dill attracts beneficial insects; nasturtium acts as ground cover and trap crop; radish matures quickly | Avoid heavy shade and poor airflow |
| Carrot-Onion Guild | Carrots, onions, leeks, chives, lettuce | Onion scent helps confuse carrot fly; lettuce fills shallow space; carrots use deeper root zone | Avoid fresh manure, which can fork carrots |
| Brassica Support Guild | Kale, cabbage, thyme, dill, calendula, clover | Aromatic herbs confuse pests; dill and calendula attract beneficial insects; clover covers soil | Avoid planting brassicas with strawberries in tight beds |
| Pepper-Basil-Alyssum | Peppers, basil, sweet alyssum, parsley | Alyssum attracts hoverflies; basil fills gaps; parsley supports beneficial insects | Avoid overcrowding peppers; they need airflow |
| Strawberry-Borage-Thyme | Strawberries, borage, thyme, chives | Borage attracts pollinators; thyme protects edges; chives add pest confusion | Avoid aggressive mint unless contained |
| Beans-Lettuce-Calendula | Bush beans, lettuce, calendula | Beans add nitrogen; lettuce uses partial shade; calendula attracts insects | Avoid onions and garlic directly beside beans |
| Potato-Horseradish-Calendula | Potatoes, calendula, horseradish in container nearby | Calendula supports beneficial insects; horseradish may help pest resistance when contained | Avoid tomatoes nearby because of shared disease pressure |
High-Yield Companion Planting Combinations for Small Beds
1 m x 2 m Tomato Guild Bed
Use one compact bed for a dense but manageable tomato polyculture.
Planting plan:
- 2 indeterminate tomatoes on a strong vertical trellis, 60 cm apart
- 4 basil plants, 25–30 cm apart
- 4 French marigolds around the corners
- 2 calendula plants at the edges
- 6 spring onions along the front
- Straw mulch between plants
Keep tomatoes pruned to one or two main stems to maintain airflow.
1 m x 2 m Salad and Herb Bed
Planting plan:
- 8 lettuce plants, 25 cm apart
- 1 row radishes, 4 cm apart
- 4 parsley plants, 20 cm apart
- 4 chive clumps, 20 cm apart
- 2 nasturtiums at the edge
- 1 small dill patch for beneficial insects
Harvest radishes first, then lettuce leaves, then herbs continuously.
Three Sisters for Small Spaces
Traditional Three Sisters planting needs room, but you can adapt it.
Minimum small-space version:
- Bed size: 120 cm x 120 cm
- 4–6 corn plants in a block, 30–35 cm apart
- 4 pole bean plants after corn reaches 20–30 cm tall
- 1 compact squash or 2 nasturtiums as ground cover
For very small gardens, replace corn with a strong trellis. This gives beans reliable support without shading the bed too heavily.
Plants That Should Be Used Carefully
Some plants are useful but aggressive in small spaces.
Grow these in containers:
- Mint
- Lemon balm
- Horseradish
- Jerusalem artichoke
- Comfrey if not sterile
- Bamboo
- Watercress
- Oregano in very small beds
A self-sufficient garden should be abundant, not chaotic. Control aggressive plants before they control the design.
5. Water Harvesting and Closed-Loop Systems
A resilient small garden captures water, stores fertility, and turns waste into resources. The more loops you close on site, the less dependent your garden becomes on external inputs.
Rainwater Harvesting for Small Homesteads
Rainwater harvesting can be simple. You do not need a large system to make a meaningful difference.
Basic setup:
- Gutter or roof edge
- Leaf screen
- Downspout diverter
- First-flush diverter if collecting from a roof
- Food-safe rain barrel
- Overflow hose
- Mulched overflow bed
A single 200 liter rain barrel can water containers, herbs, seedlings, and a small raised bed during dry periods.
Use this basic calculation:
1 mm of rain on 1 square meter of roof equals about 1 liter of water.
So, a 20 square meter roof section receiving 10 mm of rain can theoretically collect about 200 liters before losses.
Best uses for harvested rainwater:
- Seedlings
- Containers
- Greenhouse watering
- Herb beds
- Fruit shrubs
- Compost moisture
- Worm bin moisture control
Place rain barrels above garden level if possible. Even a 30–60 cm elevation improves gravity flow.
Overflow Design
Do not let overflow drain randomly against foundations, paths, or bare soil. Direct it into a productive area.
Good overflow targets:
- Mulched fruit shrub bed
- Rain garden strip
- Comfrey patch
- Willow container
- Deep mulch basin
- Berry border
- Small pond or wildlife basin where safe
A simple overflow bed can be made by digging a shallow basin 10–20 cm deep, filling it with compost and mulch, and planting water-tolerant species.
Simple Greywater Use
Greywater is lightly used household water from sinks, showers, or laundry. Rules vary by region, so check local regulations before installing any system.
For simple, safe small-space greywater thinking:
- Use only biodegradable, plant-safe soaps.
- Avoid water containing bleach, harsh cleaners, disinfectants, or high salt.
- Do not use kitchen sink water if it contains grease or meat residues.
- Do not spray greywater on edible leaves.
- Apply greywater to soil or mulch basins, not directly to crops.
- Use it mainly for fruit trees, shrubs, ornamentals, or mulch systems.
- Do not store untreated greywater for long periods.
Small-scale low-risk approach:
- Carry cooled vegetable rinse water to outdoor beds.
- Use unsalted cooking water after cooling.
- Rinse salad water into herb containers.
- Use shower warm-up water in watering cans.
- Direct laundry greywater only where legal and safe.
Drip Irrigation and Clay Pot Irrigation
Small gardens often suffer from inconsistent watering. Drip systems and clay pot irrigation help reduce waste.
Drip Irrigation
Use drip lines for:
- Raised beds
- Tomatoes
- Peppers
- cucumbers
- berry rows
- containers
Practical setup:
- Main line from rain barrel or tap
- Filter
- Pressure reducer if using mains water
- 16 mm drip line
- Emitters spaced 20–30 cm apart
- Timer if possible
Water deeply 2–3 times per week rather than lightly every day, adjusting for weather and soil type.
Clay Pot Irrigation
Unglazed clay pots buried in the soil slowly release water.
Use for:
- Containers
- Hot dry beds
- Tomatoes
- peppers
- herbs
- small raised beds
Bury the pot with the opening above soil level, fill it with water, and cover the top to reduce evaporation. Roots grow toward the moisture source.
Composting in Small Spaces
A closed-loop garden turns organic waste into fertility. Even the smallest space can compost if the method fits the site.
Option 1: Worm Bin
Best for balconies, patios, and small households.
Worm bin basics:
- Use red wiggler worms.
- Keep bedding moist but not wet.
- Feed small amounts regularly.
- Avoid meat, dairy, oily food, citrus overload, and salty foods.
- Add shredded cardboard and leaves for carbon.
- Harvest castings every 3–6 months.
A well-managed worm bin can process much of a household’s vegetable waste and produce excellent fertilizer for seedlings and containers.
Option 2: Bokashi System
Bokashi ferments food waste in an airtight bucket. It is useful for apartments because it can handle more cooked food than a worm bin, though the fermented material still needs to be buried, composted, or added to a soil factory.
Use bokashi for:
- Small kitchens
- Urban homes
- Cooked vegetable scraps
- Faster pre-composting
Option 3: Compact Hot Compost
For small yards, use a 60–100 cm wide compost bay or tumbler.
Balanced compost recipe:
- 2 parts carbon-rich material: leaves, straw, shredded cardboard
- 1 part nitrogen-rich material: kitchen scraps, grass clippings, coffee grounds
- Moisture like a wrung-out sponge
- Airflow through occasional turning or coarse material
Option 4: Chop-and-Drop Mulch
This is the simplest permaculture method. Cut plant material and leave it on the soil surface as mulch.
Good chop-and-drop plants:
- Comfrey
- Borage
- Nasturtium
- Clover
- Grass clippings
- Herb prunings
- Pea and bean vines after harvest
- Healthy vegetable leaves
Do not chop and drop diseased plants, mature weed seeds, or invasive roots.
Zero Organic Waste Design
A small permaculture garden should aim for a closed nutrient loop.
Organic material flow:
- Kitchen scraps go to worm bin, bokashi, or compost.
- Garden prunings become mulch.
- Autumn leaves become leaf mold.
- Finished compost feeds beds.
- Worm castings feed seedlings and containers.
- Crop residues protect soil.
- Seeds are saved from strong plants.
- Water is harvested and reused where safe.
Pro tip: The most sustainable fertilizer is the fertility you stop throwing away.
Small Permaculture Garden Layouts
A productive small garden should combine permanent paths, intensive beds, vertical supports, perennial plants and composting areas. The following layouts can be adapted to backyards, side yards, courtyards and urban allotments.
100 Sq Ft Permaculture Garden Layout
A 100-square-foot garden is best used for high-value and fast-growing crops rather than large staple crops.
- Two 3 x 8 ft no-dig growing beds
- One north-facing trellis for beans, peas or cucumbers
- Herbs planted along bed edges
- Strawberries or creeping thyme as ground cover
- One small worm bin or bokashi system
- Container-grown dwarf berry bush
Good crops include lettuce, spinach, kale, radish, basil, parsley, chives, pole beans, cherry tomatoes and cucumbers.
250 Sq Ft Self-Sufficient Small Garden
A 250-square-foot garden provides enough space for a more diverse crop rotation and several perennial plants.
- Three or four intensive no-dig beds
- Vertical trellis along the northern boundary
- One dwarf fruit tree or espalier tree
- Two berry bushes
- Compact compost bin
- Rain barrel connected to drip irrigation
- Pollinator strip with calendula, alyssum and nasturtium
This size is suitable for tomatoes, peppers, beans, cucumbers, leafy greens, carrots, beets, culinary herbs and a limited number of potatoes.
500 Sq Ft Permaculture Garden Layout
A 500-square-foot garden can combine annual vegetable production with perennial fruit, composting and water storage.
- Four to six permanent growing beds
- One central path and narrow access paths
- Espalier apple or pear trees along a fence
- Currants, blueberries or raspberries along the boundary
- Vertical arches over pathways
- Dedicated composting corner
- Rainwater storage and drip irrigation
- Small nursery area for seedlings
Use succession planting so that every harvested crop is followed by another. For example, spring radishes can be followed by bush beans, which can later be replaced by autumn spinach or garlic.
Best Crops for a Self-Sufficient Small Garden
The best crops for a self-sufficient small garden are productive, expensive to purchase, easy to harvest repeatedly and suitable for vertical or intensive growing.
| Crop | Why It Works in Small Spaces | Recommended Method |
|---|---|---|
| Leaf lettuce | Fast-growing and repeatedly harvested | Succession sowing |
| Kale and chard | Long harvest period | Outer-leaf harvesting |
| Pole beans | High yield from minimal ground space | Vertical trellis |
| Cherry tomatoes | Continuous harvest and high value | Single-stem vertical training |
| Cucumbers | Productive when grown vertically | Trellis or arch |
| Herbs | High value and frequent household use | Bed edges and containers |
| Radishes | Fast harvest and useful as a catch crop | Interplanting |
| Strawberries | Perennial and suitable as ground cover | Bed edges or towers |
Final Verdict: The Yield of a Mindful Design
A small permaculture garden is not just a collection of raised beds. It is a living design system. When zones, soil, vertical space, companion planting, water, and compost work together, limited space becomes productive far beyond its size.
Long-term returns include:
- More fresh food from less land
- Lower dependence on external fertilizers
- Better soil structure each season
- Improved water retention
- Reduced household organic waste
- Increased pollinator habitat
- More beneficial insects and birds
- Lower pest pressure through biodiversity
- Stronger resilience during supply disruptions
- Better mental connection to food and seasons
- Practical food security at household scale
The real yield of a small permaculture garden is not measured only in kilograms of tomatoes, baskets of herbs, or jars of preserved food. It is measured in resilience. A thoughtfully designed garden gives you skills, fertility, seeds, habitat, beauty, and independence.
Small-scale self-sufficiency does not mean withdrawing from the world. It means participating in ecological repair from the place where you stand. A balcony, courtyard, backyard, or side path can become part of a larger global shift toward soil health, biodiversity, and food systems that nourish rather than exhaust the earth.
Frequently Asked Questions
How much land is needed for a self-sufficient garden?
A garden of 100 to 500 square feet can provide herbs, salads and a meaningful amount of seasonal vegetables. Complete food self-sufficiency usually requires considerably more land because staple crops need more growing space.
Can permaculture be used in an urban garden?
Yes. Urban permaculture uses the same principles as larger systems, including zone planning, soil protection, vertical growing, rainwater harvesting, composting and plant guilds.
What is the best layout for a small permaculture garden?
The best layout uses permanent beds, narrow paths, vertical structures on the northern side, herbs along bed edges, perennial fruit near boundaries and composting close to the main growing area.
What are the most productive crops for a small garden?
Leafy greens, herbs, pole beans, tomatoes, cucumbers, radishes, chard, kale and strawberries generally provide strong yields relative to the space they require.
Can a 500 square foot garden feed a family?
A 500-square-foot garden can produce a significant amount of seasonal vegetables, but it is unlikely to provide all calories needed by a family. It is better suited to partial vegetable self-sufficiency.
4 thoughts on “Permaculture for Small Spaces: 100–500 Sq Ft Garden Plans”