
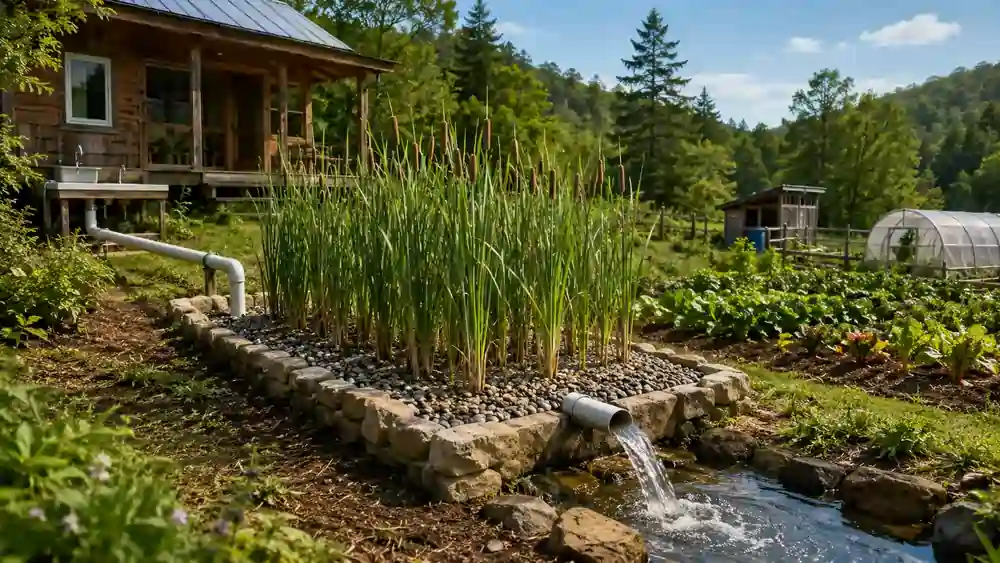
DIY Greywater Reed Bed Filter systems are designed to treat household wastewater that does not contain toilet waste. This water, known as greywater, usually comes from showers, bathtubs, bathroom sinks, hand-washing basins, and washing machines. Blackwater is completely different because it contains feces, urine, toilet paper, and high pathogen loads from toilets. For that reason, blackwater must always be handled by a septic system, composting toilet system, or approved wastewater treatment unit, and it should never be sent into a DIY garden reed bed built only for greywater.
For an off-grid homestead, greywater is one of the most underused water streams on the property. A small household may discharge hundreds of liters of lightly contaminated water every week. Instead of treating this water as waste, a properly designed reed bed filter can convert it into a resource for subsurface garden irrigation, windbreak plantings, perennial food forests, shelterbelts, and ornamental wetland landscaping.
A reed bed filter, also known as a constructed wetland, is a passive biological treatment system. It uses gravel, plant roots, oxygen transfer, microbial biofilms, and slow subsurface water movement to reduce suspended solids, organic matter, nutrients, soaps, and odors. No chlorine, no chemical dosing, no high-pressure pumps, and no complex electronics are required when the site has enough slope.
This guide focuses on a horizontal subsurface-flow reed bed filter for homestead greywater. The water enters one end of a lined gravel bed, moves slowly below the surface through plant roots and microbial biofilms, and exits through a drainage pipe for safe subsurface irrigation.
Critical safety rule: A DIY greywater reed bed is not a drinking-water system. The treated outflow must never be used for drinking, cooking, handwashing, overhead sprinklers, or direct contact with edible leaves, fruits, or root crops.
1. The Science of Phytoremediation: How Plants and Microbes Clean Water (DIY Greywater Reed Bed Filter)
1.1 The Real Cleaning Engine: Roots, Gravel, and Biofilm
In a reed bed filter, the plants are visible, but the main treatment work happens in the root zone. Aquatic and semi-aquatic plants release oxygen through their roots and rhizomes. This creates microscopic aerobic zones inside an otherwise wet gravel bed.
On the surface of gravel particles and plant roots, colonies of bacteria, fungi, protozoa, and algae form a living biofilm. As greywater passes through this biofilm, organic matter and dissolved nutrients become food for microorganisms.
The treatment process includes:
- Physical filtration: Hair, lint, skin flakes, and fine suspended solids are trapped in pre-filters and gravel pores.
- Sedimentation: Heavier particles settle before or inside the inlet zone.
- Microbial degradation: Aerobic bacteria consume organic matter measured as BOD and COD.
- Nitrification and denitrification: Nitrogen compounds are converted through microbial pathways.
- Phosphorus binding: Some phosphorus attaches to mineral surfaces in the gravel and is partly taken up by plants.
- Plant uptake: Reeds, cattails, sedges, and irises absorb nutrients into roots, stems, and leaves.
- Pathogen reduction: Pathogens decline through filtration, predation, competition, natural die-off, and unfavorable environmental conditions.
1.2 What Happens to Soap, Nitrogen, and Phosphorus?
Greywater usually contains soaps, detergents, oils from skin, hair, toothpaste residues, laundry lint, small amounts of organic matter, and nutrients. A reed bed can reduce these loads, but only when household products are chosen correctly.
Use:
- biodegradable liquid soaps,
- low-sodium laundry detergents,
- phosphate-free detergents where possible,
- plant-safe cleaners,
- oxygen-based bleach when needed.
Avoid:
- chlorine bleach,
- borax and boron-based cleaners,
- strong disinfectants,
- drain cleaners,
- solvents,
- synthetic fragrances in heavy amounts,
- antibacterial soaps,
- water softener discharge,
- paint, fuel, oil, or chemical workshop wastewater.
Hydraulic rule of thumb: A reed bed can only clean water that moves slowly enough through the root zone. Oversizing is safer than undersizing. A small system that receives too much water will short-circuit, smell, clog, and discharge poorly treated greywater.
1.3 Vertical Flow vs. Horizontal Subsurface Flow Systems
Constructed wetlands for small wastewater systems are usually built as either vertical-flow or horizontal-flow beds.
| System Type | How It Works | Strengths | Weaknesses | Homestead Suitability |
|---|---|---|---|---|
| Vertical Flow Reed Bed | Water is dosed onto the top surface and percolates downward through sand and gravel. | Excellent oxygen transfer, strong BOD removal, compact footprint. | Needs dosing cycles, more careful distribution, higher clogging risk at surface. | Good but more technical. |
| Horizontal Subsurface Flow Reed Bed | Water enters one side and moves sideways through gravel below the surface. | No exposed water, low odor, simple gravity operation, fewer mosquitoes. | Needs more surface area than vertical flow, lower oxygen transfer. | Ideal for DIY greywater treatment. |
For independent homesteads, the horizontal subsurface-flow system is usually the safest DIY choice. The water remains below the gravel surface, which reduces human contact, prevents mosquito breeding, and avoids open-water odors. It also tolerates intermittent household flows better than a highly technical mechanical treatment system.
2. Sizing and Excavation: Calculating Your Greywater Footprint
2.1 Estimate Daily Greywater Production
The first design step is to estimate daily greywater volume.
A realistic off-grid planning range is:
| Household Water Use Style | Greywater Per Person Per Day |
| Very frugal off-grid use | 25–40 L / 6.5–10.5 gal |
| Efficient low-flow household | 40–70 L / 10.5–18.5 gal |
| Standard household | 70–110 L / 18.5–29 gal |
| High-use household | 110+ L / 29+ gal |
For DIY design, use a conservative value unless you have meter data.
Recommended planning value:
60 L per person per day for an efficient homestead with low-flow fixtures.
2.2 Hydraulic Loading Formula
The basic area formula is:
Reed bed area = daily greywater volume ÷ hydraulic loading rate
For a robust horizontal subsurface-flow greywater bed, use:
Design hydraulic loading rate: 20–40 L/m²/day
A conservative DIY value is:
30 L/m²/day
Example for a 4-person homestead:
- 4 people × 60 L/day = 240 L/day
- 240 L/day ÷ 30 L/m²/day = 8 m²
- Add 25–50% safety factor for winter, guests, aging media, and uneven flow
- Final recommended bed area: 10–12 m²
2.3 Simple Sizing Table
| Household Size | Estimated Greywater | Minimum Bed Area | Safer DIY Bed Area |
| 1 person | 60 L/day | 2 m² | 3–4 m² |
| 2 people | 120 L/day | 4 m² | 5–7 m² |
| 3 people | 180 L/day | 6 m² | 8–10 m² |
| 4 people | 240 L/day | 8 m² | 10–12 m² |
| 5 people | 300 L/day | 10 m² | 13–16 m² |
2.4 Bed Shape and Dimensions
A horizontal-flow reed bed should be long enough to create contact time but not so narrow that it overloads one flow path.
Recommended geometry:
- Length-to-width ratio: 2:1 to 3:1
- Media depth: 50–60 cm / 20–24 in
- Total excavation depth: 70–85 cm / 28–33 in
- Freeboard above gravel: 10–15 cm / 4–6 in
- Bottom slope: 0.5–1% toward the outlet
- Water level: 5–10 cm / 2–4 in below gravel surface
Example for a 4-person system:
- Surface area: 12 m²
- Dimensions: 6 m long × 2 m wide
- Excavation depth: 80 cm
- Gravel/media depth: 60 cm
- Freeboard: 15 cm
2.5 Choosing the Location
The reed bed should sit between the house and the irrigation area. Gravity-fed systems are simpler and more reliable than pump-fed systems.
Site requirements:
- Place the inlet lower than the house greywater outlet.
- Maintain at least 1–2% slope in pipe runs where possible.
- Keep the bed away from building foundations.
- Keep the bed away from drinking-water wells, boreholes, springs, streams, ponds, and property boundaries according to local regulations.
- Avoid flood-prone areas.
- Avoid compacted vehicle paths.
- Choose a sunny location for vigorous plant growth.
- Allow access for inspection, pipe flushing, and plant harvesting.
Well protection warning: Never place a greywater treatment bed upslope of a drinking-water well. Local setback distances vary, but a conservative homestead design should keep greywater systems far from wells, springs, and surface water.
3. Layering the Filter: Liner, Gravel, and Sand Specifications
3.1 The Impermeable Barrier
A reed bed must not leak untreated greywater into the groundwater. The excavation is lined with an impermeable barrier before gravel is added.
Suitable liner materials:
- EPDM pond liner: durable, flexible, UV-resistant, ideal for DIY work.
- PVC pond liner: lower cost, less flexible, must be protected from puncture.
- HDPE geomembrane: very durable, but harder to weld and install correctly.
Recommended DIY liner thickness:
- EPDM: 1.0–1.2 mm
- PVC: 1.0 mm minimum
- HDPE: 1.0–1.5 mm
Install a protective geotextile under and above the liner if the soil contains stones, roots, rubble, or sharp edges.
3.2 The Multi-Stage Aggregate Filter
A horizontal reed bed is not filled with random gravel. It uses different aggregate zones to control clogging, distribute water, support roots, and collect treated outflow.
The bed has three hydraulic zones:
- Inlet zone: coarse stone spreads incoming water and resists clogging.
- Main treatment zone: medium gravel supports roots and microbial biofilm.
- Outlet zone: coarse stone and a perforated pipe collect treated water.
3.3 Layer Matrix
| Section Type | Material Specification | Depth / Thickness |
| Protective base layer | Smooth sand or geotextile under liner | 5 cm / 2 in |
| Impermeable liner | EPDM, PVC, or HDPE pond liner | 1.0–1.2 mm |
| Bottom protection | Geotextile above liner | Full bed coverage |
| Inlet zone | Washed river stone or crushed stone, 32–64 mm | First 40–60 cm of bed length |
| Main treatment zone | Washed rounded gravel, 8–16 mm | 50–60 cm deep |
| Optional polishing layer | Coarse sand or fine gravel, 4–8 mm | 5–10 cm, only if clogging risk is low |
| Outlet zone | Washed stone, 32–64 mm | Last 40–60 cm of bed length |
| Surface cover | 16–32 mm washed gravel or mulch-free stone cover | 5–10 cm |
| Freeboard | Empty space above gravel inside liner edge | 10–15 cm |
3.4 Why Sand Is Used Carefully
Fine sand can improve filtration, but it can also clog quickly when greywater contains lint, hair, fats, or soap residues. For a DIY horizontal reed bed, the main treatment material should usually be 8–16 mm washed gravel, not fine sand.
Use sand only as:
- a liner protection layer below the membrane,
- a small polishing section after strong pre-filtration,
- or a dedicated vertical-flow pre-filter that can be replaced.
3.5 Pipe Layout
Recommended plumbing:
- Inlet pipe: 50–75 mm PVC or HDPE pipe for small systems.
- Distribution pipe: perforated pipe across the full bed width.
- Inspection pipe: vertical 90–110 mm pipe at inlet and outlet.
- Outlet pipe: perforated collection pipe embedded in coarse stone.
- Adjustable outlet standpipe: controls internal water level.
The internal water level should remain below the surface of the gravel. If water appears on top, the system is overloaded, blocked, or poorly leveled.
4. Botanical Selection: Best Plants for Phytoremediation
4.1 Why Plant Selection Matters
The best reed bed plants are not delicate ornamentals. They are vigorous wetland species with aggressive rhizomes, dense root mats, high tolerance for saturated gravel, and strong seasonal regrowth.
Good plants provide:
- large root surface area for microbial biofilm,
- oxygen leakage into the root zone,
- nutrient uptake,
- winter stem structure,
- erosion control,
- hydraulic pathways through the media.
Use native or locally accepted species whenever possible. Some wetland plants can become invasive outside their native range, so check regional planting rules before installation.
4.2 Recommended Reed Bed Plants
- Phragmites australis — Common Reed
The classic reed bed plant. Extremely strong rhizome growth, high tolerance for nutrient-rich water, excellent root-zone development. Best for larger beds and cold climates. Can be invasive in some regions. - Typha latifolia — Cattail / Broadleaf Cattail
Strong biomass producer with dense roots and rhizomes. Handles wet, nutrient-rich conditions well. Useful in larger systems but can dominate small beds. - Iris pseudacorus — Yellow Flag Iris
Attractive flowering wetland plant with strong rhizomes. Good for edge zones and mixed plantings. Can also be invasive in some regions. - Juncus effusus — Soft Rush
Tolerates wet gravel and variable water levels. Useful for biodiversity and root-zone structure. - Carex acutiformis — Lesser Pond Sedge
Dense sedge growth, strong root mass, good for cooler climates and mixed wetland beds. - Scirpus / Schoenoplectus spp. — Bulrush
Suitable for saturated wetland conditions and nutrient uptake, depending on local species availability.
4.3 Planting Density
Recommended planting density:
- Phragmites australis: 4–6 plants/m²
- Typha latifolia: 3–5 plants/m²
- Iris pseudacorus: 4–6 plants/m²
- Juncus or Carex species: 6–9 plants/m²
For a 12 m² reed bed, use approximately:
- 30–40 reed plants,
- 10–15 iris plants,
- 15–20 rush or sedge plants.
Plant directly into the washed gravel. Keep the bed moist during establishment. During the first 6–10 weeks, reduce greywater loading if plants are not rooted yet.
5. Plumbing and System Maintenance
5.1 Installing the Surge Tank
A surge tank protects the reed bed from sudden hydraulic shock and coarse debris. It also allows lint, hair, and solids to be trapped before they clog the gravel.
The surge tank should include:
- removable lint basket,
- hair screen,
- sediment trap,
- overflow bypass,
- inspection lid,
- drain or cleanout valve,
- outlet positioned above settled sludge level.
Recommended size:
| Household Size | Surge Tank Volume |
| 1–2 people | 80–150 L |
| 3–4 people | 150–300 L |
| 5+ people | 300–500 L |
The surge tank is not a storage tank. Greywater should move through the system quickly. Do not hold greywater for long periods, because warm nutrient-rich water can turn anaerobic and smell.
Storage rule: Design the system so greywater is treated and dispersed within 24 hours. Long storage increases odor, pathogen risk, and anaerobic sludge formation.
5.2 What Should Enter the System?
Best greywater sources:
- showers,
- baths,
- bathroom sinks,
- laundry rinse water,
- handwashing basins.
Use caution with:
- washing machine water from synthetic fabrics because of microfibers,
- laundry with diapers, heavily soiled clothing, or oily work clothes,
- kitchen sink water because of grease and food particles.
Do not connect:
- toilets,
- urinals,
- dishwasher discharge,
- water softener brine,
- chemical cleaning drains,
- workshop sinks,
- mop sinks with disinfectants,
- veterinary or animal washing waste.
5.3 Irrigation After Treatment
The safest use for treated greywater is subsurface irrigation.
Recommended applications:
- fruit trees,
- nut trees,
- windbreaks,
- coppice systems,
- ornamental perennial beds,
- bamboo screens where appropriate,
- biomass plantings,
- non-leafy perennial crops.
Avoid:
- spraying greywater,
- irrigating salad leaves,
- irrigating root vegetables directly,
- pooling water on the surface,
- allowing livestock or pets to drink treated greywater,
- using greywater on salt-sensitive plants if detergents contain sodium.
5.4 Maintenance Checklist
Weekly:
- Check that no water is surfacing on the gravel.
- Check for odors near the inlet.
- Empty lint basket if laundry is connected.
- Inspect surge tank screen.
Monthly:
- Flush inlet distribution pipe.
- Check outlet inspection pipe.
- Confirm water level is below gravel surface.
- Remove visible debris around inlets.
- Inspect for rodent damage or liner exposure.
Seasonally:
- Cut dead stems in late winter or early spring.
- Leave some stems over winter in cold climates for insulation and oxygen transfer.
- Remove excessive plant biomass to export nutrients.
- Check for root blockage in pipes.
- Inspect overflow and bypass systems before heavy rain periods.
Annually:
- Remove sludge from surge tank.
- Test irrigation soil for salinity and pH if greywater is used heavily.
- Replace or clean lint screens.
- Inspect liner edges.
- Re-level surface gravel if settling occurs.
5.5 Winter Operation
In cold climates, reed beds continue to function at reduced biological rates. Microbial activity slows down, but the gravel bed still provides filtration and partial treatment.
Winter design improvements:
- Use 60 cm media depth rather than 40 cm.
- Keep water below the gravel surface.
- Insulate exposed pipes.
- Bury inlet and outlet pipes below frost depth where possible.
- Leave standing reed stems until spring.
- Add a mulch layer outside the liner edge, not inside the wet gravel flow path.
- Oversize the bed by 25–50% in cold regions.
Final Verdict: Closing the Water Loop
A greywater reed bed filter is one of the most practical ecological sanitation systems for an independent homestead. It does not replace responsible water use, legal compliance, or safe wastewater separation, but it transforms a daily waste stream into a productive landscape resource.
Long-term benefits include:
- major reduction in freshwater irrigation demand,
- lower load on septic systems,
- healthier perennial plantings,
- drought resilience,
- passive treatment with minimal energy use,
- chemical-free biological water polishing,
- improved homestead self-reliance,
- integration with food forests, shelterbelts, and habitat plantings,
- visible ecological infrastructure that teaches water literacy.
The key is disciplined design: separate blackwater from greywater, pre-filter solids, size the bed generously, keep water below the surface, use washed gravel, plant aggressive wetland species, and irrigate below ground.
Treating waste as a resource is not a romantic sustainability slogan. It is an engineering milestone. When water from the shower can pass through roots, gravel, microbes, and soil before feeding a living landscape, the homestead becomes less dependent, less wasteful, and far more resilient.
1 thought on “DIY Greywater Reed Bed Filter: Natural Wastewater Recycling for Your Homestead”