
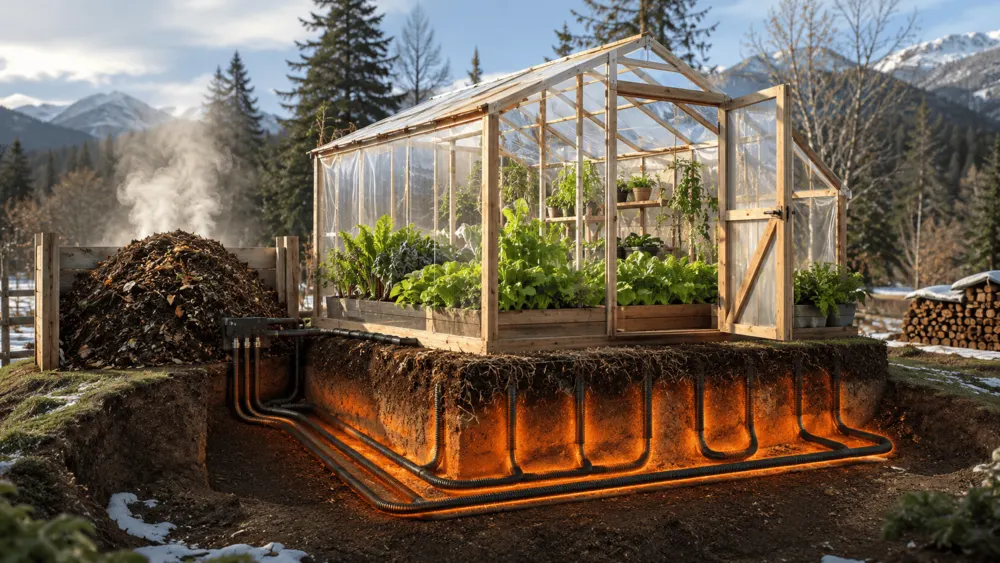
What a Subterranean Compost Heating System Actually Does
A Subterranean Heating System for a greenhouse is not a magic replacement for a boiler, wood stove, or electric heater. It is a biological heat recovery system that captures low-grade heat from an active compost pile and transfers it into the greenhouse soil, raised beds, or buried thermal mass.
The strongest design is a closed-loop hydronic system:
- A large aerobic compost pile produces heat through microbial decomposition.
- A water or water/propylene-glycol loop runs through the pile and absorbs heat.
- A small circulation pump moves the warm fluid into buried tubing under greenhouse beds or paths.
- The soil, sand, gravel, and bed mass store the heat and release it slowly through the night.
The goal is not to create tropical conditions in midwinter. The real goal is to:
- Protect seedlings from frost.
- Raise root-zone temperature by 3–8°C.
- Buffer nighttime temperature swings.
- Extend the shoulder seasons.
- Reduce dependence on grid electricity, propane, or firewood.
- Turn farm waste into both usable heat and finished compost.
For off-grid homesteads, this system is most valuable when paired with passive solar greenhouse design: insulated north wall, double glazing or twin-wall polycarbonate, thermal mass, row covers, wind protection, and tight nighttime sealing.
Rule of thumb: Compost heat is best used as root-zone heat and thermal buffering, not as the only heating source for a poorly insulated greenhouse in deep winter.
How the System Works / The Subterranean Heating System
The Biological Heat Engine
Compost heat comes from aerobic microorganisms breaking down carbon-rich and nitrogen-rich materials. The pile heats when four variables are balanced:
| Parameter | Target Range | Why It Matters |
| Carbon-to-nitrogen ratio | 25:1 to 35:1, ideal near 30:1 | Controls microbial energy and protein balance |
| Moisture | 50–60% by feel; acceptable 40–60% | Too dry stops biology; too wet causes anaerobic rot |
| Oxygen | Aerobic, porous structure | Prevents methane, sour odors, and heat collapse |
| Core temperature | 45–65°C | Main heat-producing thermophilic range |
| Particle size | 20–50 mm mixed texture | Enough surface area without compaction |
| Minimum pile volume | 3 m³ absolute minimum; 8–15 m³ recommended | Thermal mass prevents rapid heat loss |
A small backyard compost bin may get warm, but it will not reliably heat a greenhouse. A working compost heater needs volume, moisture, insulation, and airflow.
The Engineering Principle
The system transfers heat in two stages:
- Heat extraction: Tubing inside the compost pile absorbs heat.
- Heat delivery: Buried greenhouse tubing releases that heat into soil or a thermal battery.
The basic heat transfer formula is:
Heat output in watts = flow rate × water heat capacity × temperature drop
Q = ṁ × Cp × ΔT
For practical DIY use:
Approximate hydronic formula:
Watts ≈ 69.7 × flow rate in L/min × ΔT in °C
Example:
- Flow rate: 3 L/min
- Temperature drop between supply and return: 5°C
- Output: 69.7 × 3 × 5 = 1,045 W
This is the theoretical heat moved by the fluid. Real delivered heat will be lower because of losses, intermittent pump cycling, uneven compost temperature, and soil storage behavior.
Recommended System Design
Best Overall Layout
The safest and most durable layout is:
External compost bay → buried insulated pipe run → greenhouse manifold → subterranean heat battery → return line → compost bay
The compost pile should be outside the growing space or in a sealed attached bay. Avoid placing a large active compost pile directly inside a small greenhouse unless ventilation is excellent. Compost releases water vapor, CO₂, ammonia if mismanaged, and sometimes unpleasant odors.
Standard Greenhouse Example
This guide uses a practical reference greenhouse:
| Greenhouse Size | Recommended Compost Pile | Hydronic Coil | Subterranean Loop |
| 3 × 4 m / 12 m² | 6–8 m³ | 75–100 m | 80–120 m |
| 3 × 6 m / 18 m² | 10–14 m³ | 100–150 m | 120–180 m |
| 4 × 8 m / 32 m² | 18–25 m³ | 150–250 m | 200–300 m |
For most homesteads, the 3 × 6 m greenhouse is the best reference point because it is large enough to justify the system but still buildable with hand tools and common materials.
Technical Specification Matrix
| Component | Recommended Specification | Avoid |
| Compost pile footprint | 2.4 m × 3.6 m for an 18 m² greenhouse | Tiny 1 m³ bins |
| Compost pile height | 1.5–1.8 m | Over 2 m without aeration |
| Compost volume | 10–14 m³ | Less than 3 m³ for heating |
| Compost coil pipe | 20 mm oxygen-barrier PEX, PE-RT, or HDPE | Thin garden hose, PVC hot-water pipe |
| Compost coil length | 100–150 m for 18 m² greenhouse | One long 250 m unbroken loop |
| Ground loop pipe | 16–20 mm oxygen-barrier PEX or PE-RT | Non-pressure irrigation dripline |
| Ground loop depth | 350–600 mm below bed/path surface | Directly at seed-root level |
| Loop spacing | 200–300 mm | Tight coils under 100 mm spacing |
| Pump | 12V or 24V DC circulation pump, 10–30 W | Oversized high-speed pump |
| Flow rate | 2–6 L/min total | High flow that chills compost core |
| Heat-transfer fluid | Water or 20–30% propylene glycol mix | Ethylene glycol |
| Expansion protection | Expansion tank + pressure relief valve | Fully sealed system without relief |
| Controls | Differential thermostat | Manual-only operation |
| Sensors | Compost core, coil outlet, return, soil temp | No temperature monitoring |
Materials List for a 3 × 6 m Greenhouse
Hydronic and Plumbing Materials
| Item | Quantity | Notes |
| 20 mm oxygen-barrier PEX / PE-RT / HDPE pipe | 200–300 m total | 100–150 m compost coil, 100–150 m greenhouse loop |
| Insulated underground supply/return pipe | 10–20 m | Depends on distance from compost bay |
| 12V or 24V DC circulation pump | 1 | 10–30 W, rated for glycol if used |
| Differential temperature controller | 1 | Compost outlet vs soil/battery temperature |
| Temperature sensors | 4–6 | Waterproof probes |
| Small expansion tank | 2–8 L | Hydronic-rated |
| Pressure relief valve | 1 | Usually 2–3 bar for small low-pressure systems |
| Fill/drain valves | 2–4 | At low points |
| Air bleed valve | 1–2 | At high points |
| Check valve | 1 | Prevents reverse thermosiphon if needed |
| Manifold | 1 | Two or more circuits are better than one long loop |
| Pipe insulation | As needed | Critical outside greenhouse |
| Propylene glycol | As needed | Use only where freeze risk exists |
| Hose clamps/compression fittings | As needed | Match pipe material |
Subterranean Heat Battery Materials
| Item | Quantity | Notes |
| Washed sand | 0.5–1.5 m³ | Bedding layer around pipe |
| Drainage gravel, 16–32 mm | 1–3 m³ | Optional for thermal battery under paths |
| Geotextile fabric | 20–40 m² | Separates soil and gravel |
| Rigid insulation board | Optional | For perimeter and north edge |
| Marker tape | 1 roll | Prevents future shovel damage |
| Compost thermometer, 500–900 mm probe | 1 | Non-negotiable |
| Soil thermometer | 1–2 | Root-zone monitoring |
Compost Feedstock for 10–14 m³ Pile
A reliable heating pile needs woody carbon, nitrogen, moisture, and microbial inoculation.
| Ingredient | Volume Ratio | Example Quantity |
| Fresh wood chips or chipped brush | 55–65% | 6–8 m³ |
| Fresh grass clippings, green weeds, spent crops | 15–25% | 2–3 m³ |
| Manure from herbivores | 10–20% | 1–2 m³ |
| Straw, shredded leaves, or spoiled hay | 5–15% | 0.5–1.5 m³ |
| Finished compost or forest soil | 2–5% | 100–300 L |
| Water | Until 50–60% moisture | Usually 1,000–3,000 L depending on dryness |
Critical rule: The pile should feel like a wrung-out sponge. When squeezed hard, it should release only a few drops of water. If water streams out, it is too wet.
Feedstock Ratios and Compost Recipe
Recommended Heating Recipe
For one 10–14 m³ pile:
- 6 m³ fresh hardwood/softwood chips, ideally mixed species
- 2 m³ green grass clippings or fresh chopped weeds
- 1.5 m³ aged or fresh herbivore manure
- 1 m³ shredded leaves or straw
- 200 L mature compost or biologically active soil
- Water added in layers until 50–60% moisture
This recipe gives:
- Enough carbon for a long burn.
- Enough nitrogen for fast thermophilic activity.
- Enough structure for oxygen.
- Enough microbial inoculation to start quickly.
- Enough mass to resist winter heat loss.
Materials to Avoid
Do not use:
- Treated wood chips
- Painted or glued timber waste
- Large quantities of citrus or onion waste
- Meat, dairy, grease, or cooked food
- Dog, cat, or human feces
- Diseased plant material unless the pile will be professionally managed
- Black walnut chips in systems where the finished compost will be used around sensitive crops
- Fresh manure in direct contact with edible crops
The heat-extraction coil is inside the compost pile, but the compost itself should never leak into the greenhouse water system.
Step-by-Step Build Guide
Step 1: Calculate the Greenhouse Heating Role
Before building, decide what the system must accomplish.
Use this basic classification:
| Goal | Realistic? | Notes |
| Prevent light frost | Yes | Best use case |
| Warm root zone for winter greens | Yes | Very effective |
| Start seedlings 2–4 weeks earlier | Yes | Strong practical benefit |
| Heat a greenhouse to summer temperatures | No | Requires much more energy |
| Replace all winter heating in cold climates | Usually no | Only possible with excellent insulation and backup heat |
For a 3 × 6 m greenhouse, expect the system to be a thermal stabilizer. On cold nights, it may keep the soil and lower air layer several degrees warmer, but it should not be the only frost-protection strategy.
Step 2: Choose the Compost Bay Location
Place the compost bay:
- 1–5 m from the greenhouse if possible.
- On the north side if wind exposure is manageable.
- Slightly downhill from the greenhouse only if drainage is controlled.
- Away from wells, surface water, and building foundations.
- Accessible by wheelbarrow or tractor bucket.
- On compacted soil, gravel, or a concrete slab with drainage.
Recommended compost bay size for 18 m² greenhouse:
- Internal width: 2.4 m
- Internal length: 3.6 m
- Wall height: 1.5 m
- Working height after piling: 1.5–1.8 m
- Volume: 10–14 m³
Use timber, block, roundwood, straw bales, IBC cage panels, or welded wire with posts. The structure must resist outward pressure from wet biomass.
Step 3: Build Drainage and Access
At the bottom of the compost bay:
- Grade the base slightly away from the greenhouse.
- Add 100–150 mm coarse wood chips or drainage gravel.
- Install a simple leachate collection trench if required by local conditions.
- Keep the pile off standing water.
- Leave access on one side for rebuilding the pile.
Do not allow nutrient-rich leachate to run into waterways, drains, or wells.
Step 4: Build the Compost Heat-Extraction Coil
Use 20 mm oxygen-barrier PEX, PE-RT, or HDPE pipe.
For the compost pile:
- Use 100–150 m pipe for a 10–14 m³ pile.
- Split into two circuits of 50–75 m if possible.
- Keep coil spacing around 250–400 mm.
- Avoid tight kinks.
- Avoid burying fittings deep inside the pile.
- Keep all joints outside the compost where they can be inspected.
Coil placement:
- Start 300 mm above the base.
- Keep pipe at least 300 mm inside the outer pile surface.
- Spiral or snake the tubing through the central hot mass.
- Keep the final layer of coil at least 300 mm below the top surface.
- Mark supply and return clearly.
Rule of thumb: Keep the coil in the hot core, not near the cold outer skin of the pile.
Step 5: Excavate the Subterranean Greenhouse Heat Battery
Inside the greenhouse, decide where heat should be stored.
Best locations:
- Under central paths
- Under raised beds
- Under propagation benches
- Under a sand or gravel thermal battery
- Along the cold north-side bed
Avoid placing hot tubing directly in shallow seedling trays or very close to tender roots.
For a 3 × 6 m greenhouse:
- Trench depth: 450–600 mm
- Trench width: 300–500 mm
- Pipe depth: 350–500 mm below finished surface
- Pipe spacing: 200–300 mm
- Sand bedding below pipe: 50 mm
- Sand cover above pipe: 50–100 mm
- Soil cover above sand: 250–400 mm
Recommended layering:
- Native subsoil compacted lightly.
- Optional 25–50 mm rigid insulation at perimeter only.
- 50 mm sand bed.
- Hydronic pipe loop.
- 50–100 mm sand cover.
- Optional geotextile.
- Soil, compost, or bed mix.
- Marker tape 150 mm above pipe where digging risk exists.
Step 6: Install the Greenhouse Distribution Loop
For 18 m², use 100–150 m of 16–20 mm tubing inside the greenhouse.
Better design:
- Two loops of 50–75 m each
- Connected to a small manifold
- Balancing valves on each loop
- Drain point at lowest point
- Air bleed at highest point
Avoid one very long loop. Long loops create high resistance, uneven heat delivery, and weak flow.
Step 7: Connect the Pump, Controller, and Safety Hardware
A basic closed-loop system should include:
- Circulation pump
- Expansion tank
- Pressure relief valve
- Fill valve
- Drain valve
- Air bleed
- Temperature sensors
- Differential controller
- Optional strainer before pump
- Optional check valve
Recommended controller logic:
- Pump ON when compost outlet is at least 5°C warmer than greenhouse return.
- Pump OFF when temperature difference falls below 2°C.
- Pump OFF if greenhouse soil battery exceeds 22–25°C.
- Pump OFF if compost core drops below 38–40°C for more than 24 hours.
- Pump ON during sunny winter afternoons only if the pile has recovered.
This prevents over-extracting heat and cooling the compost biology.
Step 8: Fill and Pressure-Test the Loop
Before burying anything permanently:
- Flush all pipe loops with clean water.
- Fill with water or propylene-glycol mix.
- Bleed air from high points.
- Pressurize to the intended operating pressure.
- Check every fitting.
- Run the pump for 30–60 minutes.
- Confirm flow through each loop.
- Only then bury and cover.
Use propylene glycol where pipes can freeze. Do not use ethylene glycol in a greenhouse or food-growing system.
Step 9: Build the Compost Pile Around the Coil
Build the pile in layers:
- Add 300 mm coarse wood chips at the base.
- Wet the layer thoroughly.
- Add green material and manure.
- Add carbon material.
- Add compost inoculant.
- Lay pipe coils gradually as the pile rises.
- Keep the pipe inside the hot central zone.
- Continue layering until the pile reaches 1.5–1.8 m.
- Cover with 150–300 mm straw, leaves, old hay, or wood chips for insulation.
- Add a breathable tarp if the climate is very wet.
Do not use a waterproof tarp sealed tightly over the entire pile. The pile needs oxygen.
Step 10: Start Monitoring Before Heating the Greenhouse
Let the pile heat for 3–7 days before running the pump continuously.
Target startup profile:
| Day | Expected Behavior |
| 1–2 | Pile begins warming |
| 3–5 | Core reaches 40–55°C |
| 5–10 | Strong thermophilic activity |
| 10–30 | Most stable heat window |
| 30–90 | Gradual decline depending on pile size |
| 90–180 | Low but useful residual heat if pile is large and woody |
Start the pump only when:
- Compost core is above 45°C.
- Outlet water is clearly warmer than return water.
- There are no leaks.
- The pile smells earthy, not sour or rotten.
Operating Targets
| Measurement Point | Good Range | Action if Outside Range |
| Compost core | 45–65°C | Below 40°C: check moisture, oxygen, nitrogen |
| Compost surface | 25–45°C | Low surface temp is normal in winter |
| Supply water to greenhouse | 25–45°C | Above 50°C may overheat roots |
| Return water | 18–35°C | Low return indicates high extraction |
| Soil battery | 12–22°C | Above 25°C: reduce pump runtime |
| Greenhouse root zone | 10–18°C for winter greens | Crop-specific adjustment needed |
| ΔT supply-return | 3–10°C | Below 2°C: little useful heat transfer |
Operating rule: If the pile temperature drops quickly after the pump starts, the pump is extracting heat faster than the biology can replace it.
Technical Comparison: Compost Heater Options
| System Type | Heat Transfer Method | Best For | Complexity | Main Advantage | Main Weakness |
| Passive compost inside greenhouse | Direct radiant and convective heat | Very small tunnels, emergency frost buffer | Low | Simple, no pump | Moisture, odor, pests, CO₂/ammonia risk |
| External compost pile with hydronic loop | Water/glycol transfers heat to greenhouse | Most homesteads | Medium | Clean, controllable, safer | Requires plumbing and pump |
| Compost pile against greenhouse wall | Conductive heat through shared wall | Mild climates | Low-medium | Simple layout | Poor control, uneven heat |
| Compost air duct system | Warm air pulled through/around pile | Experimental systems | High | Can move air quickly | Gas, condensation, bioaerosol risk |
| Compost + buried hydronic battery | Warm fluid heats soil/thermal mass | Seedlings, winter greens, frost protection | Medium-high | Best stability | More excavation |
| Compost + water tank buffer | Coil heats insulated water tank | Larger systems | High | Better heat storage | More cost, more plumbing |
The best balance for DIY use is the external compost pile with a closed hydronic loop feeding a buried greenhouse heat battery.
Example Design: 18 m² Off-Grid Greenhouse
Greenhouse
- Size: 3 m × 6 m
- Cover: twin-wall polycarbonate or double polyethylene
- North wall: insulated
- Beds: two 900 mm beds plus central path
- Climate goal: frost buffering and root-zone heating
- Backup: row cover or small emergency heater during severe cold snaps
Compost Bay
- Size: 2.4 m × 3.6 m × 1.5 m
- Volume: about 13 m³
- Insulation: straw bales or 150 mm loose straw/wood chips around exposed sides
- Cover: breathable tarp or old greenhouse plastic held above the pile, not sealed
Hydronic System
- Compost coil: 2 × 60 m of 20 mm oxygen-barrier PEX
- Greenhouse loop: 2 × 60 m of 16–20 mm PEX
- Pump: 12V DC, 20 W
- Solar panel: 50–100 W dedicated PV panel
- Battery: 12V 20–50 Ah LiFePO₄ or equivalent
- Fluid: water in mild climates; 20–30% propylene glycol where freezing is possible
- Controller: differential thermostat
Expected Performance
In a well-built system, expect:
- Compost core: 45–65°C during active phase
- Useful heating period: 60–120 days for strong heat, longer residual warmth if woody
- Root-zone lift: 3–8°C depending on greenhouse insulation
- Best result: frost reduction, stronger seedlings, earlier spring start
- Worst result: modest soil warming if pile is too small, too dry, compacted, or overpumped
Maintenance and Management Protocols
Daily Checks During First 2 Weeks
Check:
- Compost core temperature
- Pump operation
- Supply and return temperatures
- Leaks
- Smell
- Soil battery temperature
Healthy smell: earthy, woody, warm forest floor.
Warning smell: sour, rotten, ammonia-heavy, sewage-like.
Weekly Checks
| Task | Target |
| Probe compost temperature in 3–5 locations | Confirm heat is not isolated |
| Check moisture | Wrung-out sponge feel |
| Inspect pile slump | Rebuild sides if collapsing |
| Check pump filter/strainer | Remove debris if present |
| Record supply/return temperature | Track ΔT |
| Inspect greenhouse soil temperature | Prevent overheating |
| Check pressure gauge | Detect leaks or expansion problems |
Monthly Checks
- Add water if the pile dries.
- Add dry carbon if ammonia smell appears.
- Add nitrogen-rich material if the pile cools and carbon is excessive.
- Loosen compacted areas with a compost aerator.
- Inspect pipe exits for abrasion.
- Check insulation around buried supply/return lines.
- Recalibrate sensors if readings seem wrong.
Seasonal Rebuild
A compost heater is not permanent. Plan a rebuild every season or every major heating cycle.
Typical timeline:
| Stage | Time |
| Build and heat-up | Week 1 |
| Strong thermophilic output | Weeks 2–8 |
| Moderate heat | Weeks 8–16 |
| Declining heat | Months 4–6 |
| Compost curing | Months 4–12 |
| Use finished compost | After full curing and maturity |
Do not apply unfinished hot compost directly to sensitive crop roots.
Troubleshooting Matrix
| Problem | Likely Cause | Fix |
| Pile does not heat | Too dry, too small, too much carbon | Add water, nitrogen, increase volume |
| Pile smells sour | Too wet, anaerobic | Add dry wood chips/straw, aerate |
| Strong ammonia smell | Too much nitrogen | Add carbon, reduce manure/greens |
| Pump runs but no heat | Airlock, poor flow, cold pile | Bleed air, check pump, verify compost temp |
| Compost cools after pump starts | Over-extraction | Reduce pump speed/runtime |
| Soil too warm | Tubes too shallow or pump runs too long | Reduce runtime, increase thermostat limit |
| Uneven bed temperature | Loop imbalance | Add manifold balancing valves |
| Pipe freezes | No glycol, poor insulation | Use propylene glycol, insulate exposed lines |
| Greenhouse still freezes | Heat loss exceeds compost output | Add row cover, seal leaks, add backup heat |
| Pests appear | Food scraps/manure exposed | Cover with carbon layer, secure pile |
Safety Rules
Biological Safety
- Keep fresh manure and active compost outside the crop root zone.
- Do not use humanure in a greenhouse heating pile.
- Do not use dog or cat waste.
- Do not use diseased plant waste unless the pile is professionally managed.
- Cure finished compost before applying to edible beds.
- Wash hands after handling compost.
Plumbing Safety
- Never build a fully sealed heating loop without expansion capacity.
- Use an expansion tank and pressure relief valve.
- Keep fittings accessible.
- Avoid buried joints.
- Use pipe rated for warm water and pressure.
- Do not connect directly to potable water without backflow protection.
- Use propylene glycol, not ethylene glycol.
Electrical Safety
- Use outdoor-rated wiring.
- Protect circuits with GFCI/RCD.
- Keep controllers dry.
- Use strain relief on cables.
- Mount batteries away from compost moisture.
- Fuse DC circuits properly.
Greenhouse Air Safety
Avoid actively blowing air through compost into the greenhouse. Warm compost air may carry moisture, odors, ammonia, CO₂, fungal spores, or bioaerosols. Closed-loop hydronic transfer is cleaner and more controllable.
Cost Estimate
| Budget Level | Approximate Cost | Description |
| Salvage build | Low | Reused pipe, simple pump, manual monitoring |
| Practical homestead build | Medium | New PEX, DC pump, controller, sensors |
| Professional DIY build | Higher | Manifold, insulated lines, data logging, battery backup |
The pipe and pump are usually the largest direct costs. Compost feedstock is often free or low-cost if sourced from tree services, livestock bedding, garden cleanup, and farm waste.
Design Rules of Thumb
Compost volume: Use at least 0.5–0.8 m³ of active compost per 1 m² of greenhouse floor for meaningful frost-buffering performance.
Pipe length: Use roughly 6–10 m of heat-extraction pipe per 1 m³ of compost, split into multiple circuits when possible.
Ground loop spacing: Keep buried hydronic tubing 200–300 mm apart for even soil warming.
Pump control: Run the pump only when the compost loop is at least 5°C warmer than the greenhouse return loop.
Moisture: Compost should be moist enough to support biology, but porous enough to breathe.
Insulation first: Every euro or dollar spent sealing greenhouse leaks and insulating the north wall usually beats adding more compost pipe.
Final Verdict: Is a DIY Compost-Powered Subterranean Heating System Worth It?
A compost-powered Subterranean Heating System is worth building when the goal is resilience, not luxury heating. It is an excellent low-tech system for off-grid growers who already have access to wood chips, manure, crop residues, leaves, and basic plumbing tools.
It is strongest for:
- Winter greens
- Seedling propagation
- Frost protection
- Passive solar greenhouse support
- Shoulder-season extension
- Homestead waste cycling
- Decentralized, low-cost resilience
It is weakest when expected to perform like a boiler. Compost heat is biological, seasonal, variable, and management-dependent. A small pile cannot defeat a leaky greenhouse in a hard freeze. A large, well-managed pile connected to a buried hydronic heat battery can, however, make the difference between dead seedlings and a stable growing system.
The best professional-grade DIY approach is clear:
Build the compost pile outside the greenhouse, extract heat with a closed hydronic loop, store that heat underground in the greenhouse soil mass, and control the pump with temperature sensors.
That design gives the highest safety, the cleanest air, the most stable root-zone heat, and the most useful long-term return: warm crops during the season and finished compost afterward.